Open topic with navigation
Moving MultiValue (MV) Data to a SQL Server Data Warehouse
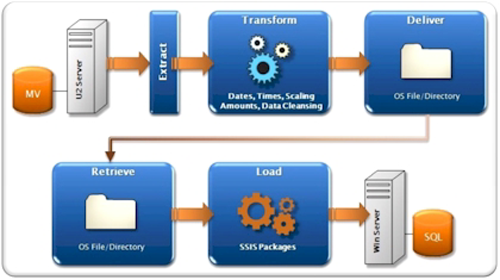
The information contained in this guide outlines the steps required to move a MultiValue (MV) file to Microsoft SQL server using Kore's SQL Accelerator and Kourier products.
This guide is focused on the process of populating the Staging Database (diagrammed below). It is common to produce both operational and analytical reporting directly from the staging database.
Before getting started, your team should conduct a planning meeting to determine your specific strategy and conventions for the data warehouse project. See the Best Practices for Building a Data Warehouse using Kourier topic for more information.
We suggest the following directory structure to organize the various files used in this process. After information is extracted from your server, Kourier sends that information to the Kourier ETL server to a location which has the following directory structure (often referred to the staging area).
|
|
|
|
...\ODS\Inbox
|
Contains the datasets to be imported by the SQL SSIS packages. This directory must be visible to both your MV server and the SQL server.
|
|
...\ODS\Logs
|
Contains the logs files generated by each SSIS package.
|
|
...\ODS\Config
|
Contains the configuration files used by the Kore's SQL Accelerator.
|
|
...\ODS\Packages
|
Contains the SSIS packages created by Kore's SQL Accelerator.
|
|
...\ODS\Schema
|
Contains schema information generated by the quick-start tools.
|
|
...\ODS\Scripts
|
SQL utilities that come installed with Kourier. The following scripts are included:
|
|
|
|
LIST_ALL_RUNNING_PACKAGES
|
List all Kourier packages from Kourier Package control that are in the running state for all databases.
|
|
LIST_RUNNING_PACKAGES
|
List all Kourier packages from Kourier Package control that are in the running state for the database you are connected to.
|
|
REMOVE_RUNNING_PACKAGE
|
Remove running package from Kourier Package control that is in the running state.
|
|
SQL_WRITE_PERFORMANCE_TEST
|
Used to get a baseline measure of expected SQL performance.
|
|
|
...\ODS\Suitcases
|
Serves as the repository for the suitcases you create.
|
Assumptions made in the Guide
- The Quick Start Workbench Configuration has been set up to reflect the installation's requirements.
- The column names used in the Kourier export must match the column names in the target SQL table.
- The name of the target SQL table is defined in the Kourier Export definition.
- The name of the export file will follow the naming convention of: SrcId_(7digitseqno)_sqltablename.export_mode
- A DSN has been created that points to the ...\ODS\Inbox.
Defining Quick Start Workbench Defaults
Before starting to move data from the MV environment, the Quick Start Workbench Configuration must be defined. This page may be accessed under the Administration menu.
Exporting a MV File to SQL Server - an overview
The process of moving data from each file in the nested relational model of a MultiValue database to the 1st normal form model of SQL consists of 8 primary steps:
- Analyze the MultiValue file by generating a Schema.
- Review the generated Schema, and modify it as needed to reflect the actual data structures
- Move the final Schema back into Kourier
- Generate Kourier Exports and Services from the Schema
- Verify and edit the Exports as necessary
- Generate SQL Data Definition Language (DDL) statements to create tables in SQL Server which will follow the defined Schema, and create the tables using this DDL.
- Generate SSIS packages which will process the Kourier Exports and load them to SQL Server.
- Run the generated Services
Once these steps have been performed, the data will be available in SQL Server for reporting or analysis.
Using the Quick Start Workbench to Generate and Edit a Schema
- In most MV systems, the dictionaries for a file do not accurately reflect the structure of the data. Use the Quick Start Workbench to analyze the data in a file and compare it to the data defining dictionaries (D-type) for the file. This generates a Schema, which may be checked out in the form of an Excel workbook which should be saved in the ...\ODS\Schema folder.
- Review and edit the resulting Schema in Microsoft Excel using this procedure.
- Once the Schema has been edited and saved, use the Quick Start Workbench to check in the Schema.
Generating Exports, Services and SSIS Packages
- In the Quick Start Workbench with the source data file selected, click the Generate Exports button. This will generate at one Export for all single-valued fields in the schema, and one Export for each group of associated multi-valued fields. Any multi-valued field with no association will generate its own separate Export. One Kourier Service will also be generated. This Service will run all of the Exports generated from the Schema.
- Review each export created by the Quick Start Workbench. The overall goal of each export is to take advantage of the power of SQL without carrying along MV database conventions that work against you in the SQL environment.
Refer to the Best Practices for Building a Data Warehouse using Kourier topic for more information.
- Review the Service created by the Quick Start Workbench.
- Remove any export deleted in a prior step.
- Choose a target DSN.
- Verify that the Autorun SSIS Package checkbox is set if you want the SSIS packages to be run after each Service run
- While in the Service, use the DDL button to generate a SQL script to create the SQL tables based upon the Exports called by the Service. Paste that script into the SQL Query tool of SQL Server Management Studio, verify that the correct database is selected, and execute the script. Verify that the SQL tables have been properly created.
- While in the Service, use the Generate Package button to access the SSIS configuration screen. Review the parameters in this screen and click the Generate button to create the SSIS package. NOTE: The first time SSIS packages are generated for a new Integration, The Configuration File must be specified and edited.
Moving data to SQL using generated Exports, Services and SSIS Packages
- While in the service, run the service in full refresh mode to extract the data from U2 or ODBC and move it to the ...\ODS\Inbox.
- If the Autorun SSIS Packages option is not set for the Service, run the SSIS job to load the exported data.
- Resolve any errors which may be reported by the SSIS packages. The most common errors are:
Duplicate primary keys caused by the fact that MV databases are case-sensitive and SQL tables (by default) is case-insensitive.
Data truncation caused by the data in MV database exceeding the defined length of a column in the SQL table.
Wrong data types.
- Repeat the above steps on each MV file you plan on moving to SQL Server.
Related Topics:
U2 to SQL Export
ODBC to SQL Export
Quick Start Workbench
Quick Start Schema Editing
Quick Start Configuration
Generate SSIS Package